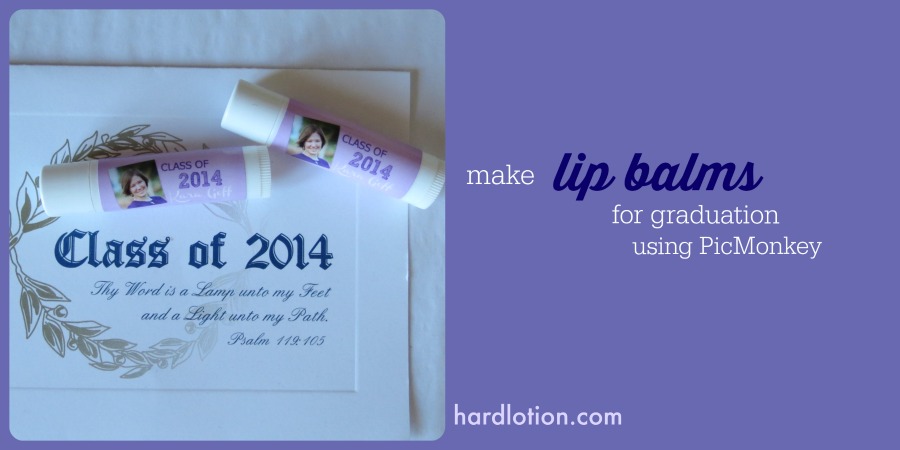
May and June are busy months for graduations and parties; a perfect gift for the graduate would be to supply the party favors. This month, I created lip balms for a friend who graduated high school this year. Follow along and I’ll show you how it’s done:
THE RECIPE: My basic recipe is to weigh equal amounts of beeswax, coconut oil and shea butter in a double boiler. Melt. Use a dropper to drop into the lip balm tubes. View the process here. Add a bit more coconut oil if you live in a colder climate because it may need to be slightly softer. Each tube can hold .15 oz, so if you make a total of 100 lip balms, you would need at least 15 oz’ worth of lip balm mixture, or 5 oz of each ingredient. The DIY kit I sell on my site can make approximately 80 lip balms, although you’d need to purchase additional tubes (see resources below). You can color, scent, or use different oils and butters by checking out the various lip balm posts on my blog or read up on flavoring the lip balm in my Gift Giving e-book.
WHERE TO BUY THE INGREDIENTS & SUPPLIES*: I recommend shopping at FromNatureWithLove.com or MountainRoseHerbs.com for your supplies and ingredients. You can buy everything from either of these companies, including the lip balm tubes. For just the ingredients, you can shop my store. There’s a break-down in cost comparison in the Gift Giving e-book I sell. The labels can be purchased by the sheet here (although check with the size to make sure it’s a fit you like), or, my preference, here.
HOW TO MAKE THE LABELS: Now the fun part.
- Go to www.picmonkey.com and create a custom size label (Hover over “Design” at the top tab, choose “Custom”). Choose 506 x 638 px.
- Choose a canvas color. Look at the colors of the graduate’s invitation, party theme/color, or his/her graduate pictures. I chose purple because the graduate, Kara, was dressed in a lovely purple dress for her graduation pictures. Hit apply and now you have a colored canvas to work with.
- Play around with PicMonkey’s “Textures” or “Effects” tabs. This is how I added the soft edges to the purple.
- Add a photo to the lip balm using the “Overlay” option on PicMonkey. Rather than ask for a photo to be sent to me, I went to Kara’s Google+ account and looked at all the photos she put up. I did a quick screen shot of her face close up, then used PicMonkey (open in another browser so you can work two projects simultaneously) to apply a drop shadow from the “Frames” tab to her photo, and then saved her beautiful face to my desktop. I then returned to my original project and added the face shot as an overlay.
- Time for text. Play around with the different font that PicMonkey offers. Try the font colors in both light or dark colors, as you might find that white stands out nicely against a dark background.
- How much text to add? Do you include the ingredients, weight, etc.? What about your logo, if you’re a small business? Ultimately, I decided that simple was best. Also, it’s about Kara, not me, and not the ingredients, either (although I checked to see what it would like with the ingredients’ listing… it was just too busy). You can include the ingredients on the part of the label where the ends meet, if you think it’s important to include. I considered including the actual date of graduation, but it added too much to the small space, so I included only the year.
- Save your work, create your labels using something like this, and print out your draft to see how it looks.
UPDATE:
Make the labels using https://www.canva.com/logos/templates/
Over the past couple years I have fallen in love with Canva. Canva stores thousands of images that you can use for free, or purchase for just a dollar (or even less if you purchase credits in bulk). Canva is a simple, drag-and-drop, design software that’s completely online and free to use. They’ve been around for over 2 years and already have 17 million users. What I love about it is that unlike PicMonkey, I can actually store the designs I create.
Start with this template post and then explore all the many options that Canva offers: https://www.canva.com/photo-collages/
*A few of the links are affiliate links.


2 comments. Leave new
Generally I do not read post on blogs, however I would like to say
that this write-up very forced me to take a look at and do so!
Your writing style has been amazed me. Thank you,
quite great article.
Hello there I am so grateful I found your website, I really found you by mistake, while I was browsing on Digg
for something else, Anyways I am here now and would just like to say
cheers for a incredible post and a all round interesting blog (I also love the theme/design), I don’t
have time to read it all at the moment but I have bookmarked it
and also added in your RSS feeds, so when I have time I will be back to read a lot more, Please
do keep up the excellent work.